Para conocer más detalles sobre las especificaciones de los núcleos, por favor echa un vistazo a nuestra página de fabricación
Preguntas Frecuentes
Aquí tienes una selección de preguntas y temas sobre los que nos preguntan habitualmente nuestros clientes.
No podemos cubrirlo todo aquí, por lo que si tienes más preguntas sobre nuestra gama de producto o capacidades, simplemente
contacta con nuestro equipo de ventas.
Para conocer más detalles sobre las especificaciones de los tanques, por favor echa un vistazo a nuestra página de fabricación

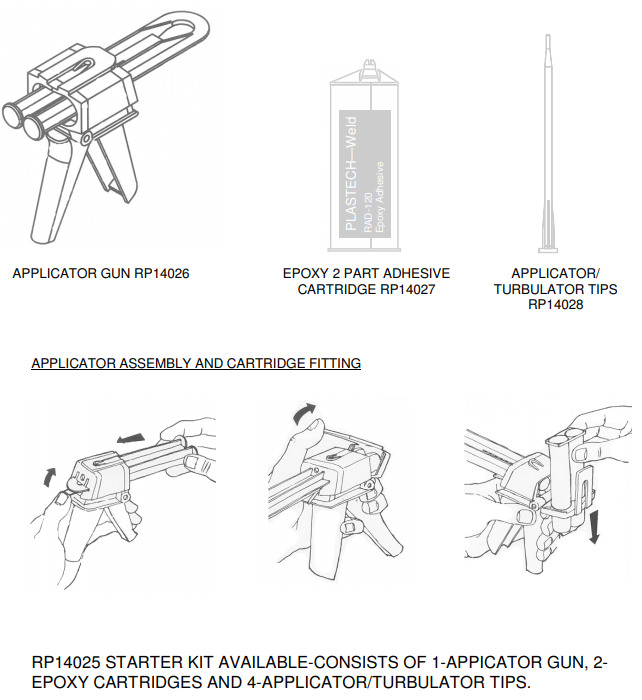
Remove the sealing cap from the two-part Epoxy cartridge
and squeeze a little of the Epoxy out.
This will ensure that
both cylinders of the cartridge are operating and any air
locks are cleared.
If the ambient temperature is very low or
the Epoxy is too viscous to squeeze out, replace the cap
and immerse the cartridge in a container of hot water for 10-
15 minutes.
Please note, the plunger of the applicator gun is
made of plastic and is actuated by a metal cam inside the
applicator. Pulling the trigger repeatedly when the Epoxy is
too viscous or if there is a blockage will result in damage to
the gun or splitting of the cartridge.
Before applying the Epoxy, the repair area should be keyed.
This can be achieved by scoring the surface with a file or
rough sandpaper. Use a solvent to remove all traces of dirt,
grease and oil. Unless the repair area is spotlessly clean,
the repair will be ineffective.
The Epoxy should cure in approximately 4 hrs, however this
time can be reduced by warming the repair with a heat gun.
If the Epoxy starts to crystallise, the temperature is too high.
It may be advisable to practise the technique first to determine the optimum temperature required when using different equipment.
A new turbulator tip (RP14028) MUST be used every time
you apply the Epoxy. It is therefore advisable, where practical, to carry out several repairs in order to minimise waste.
Always remove and discard the turbulator tip after use and
securely refit the sealing cap.

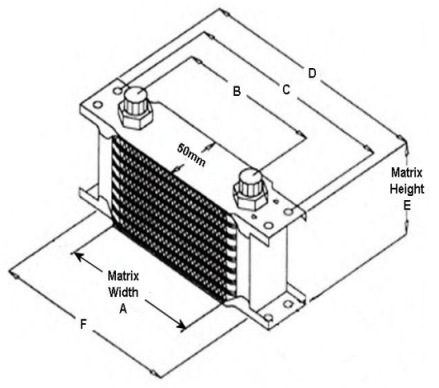
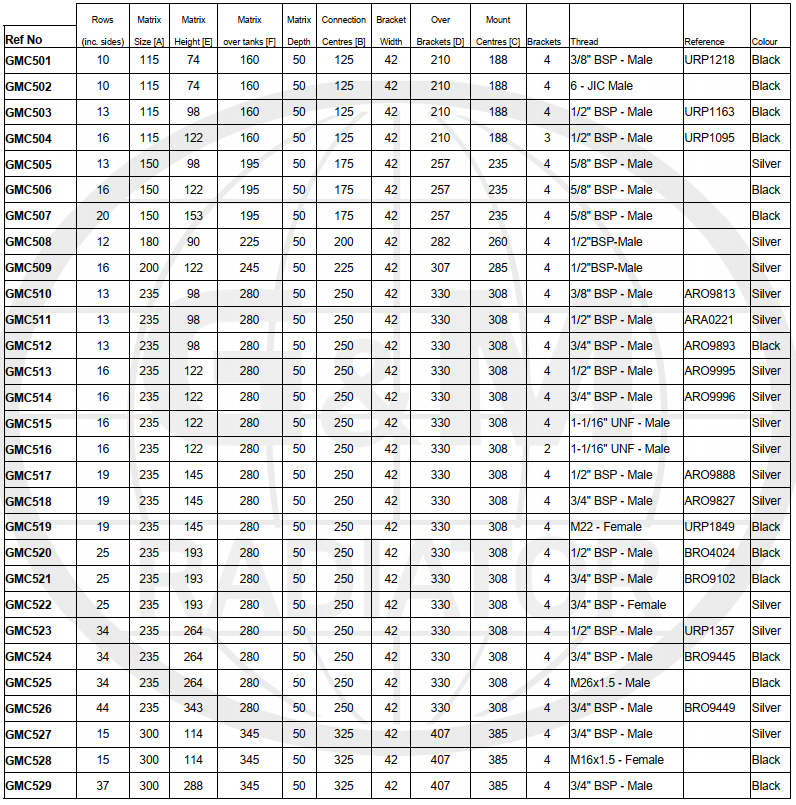
Enfriadores de fluidos multiusos. Varios tamaños y tipos de conexiones. Presión máxima de trabajo de 1.300 kpa (188 psi).

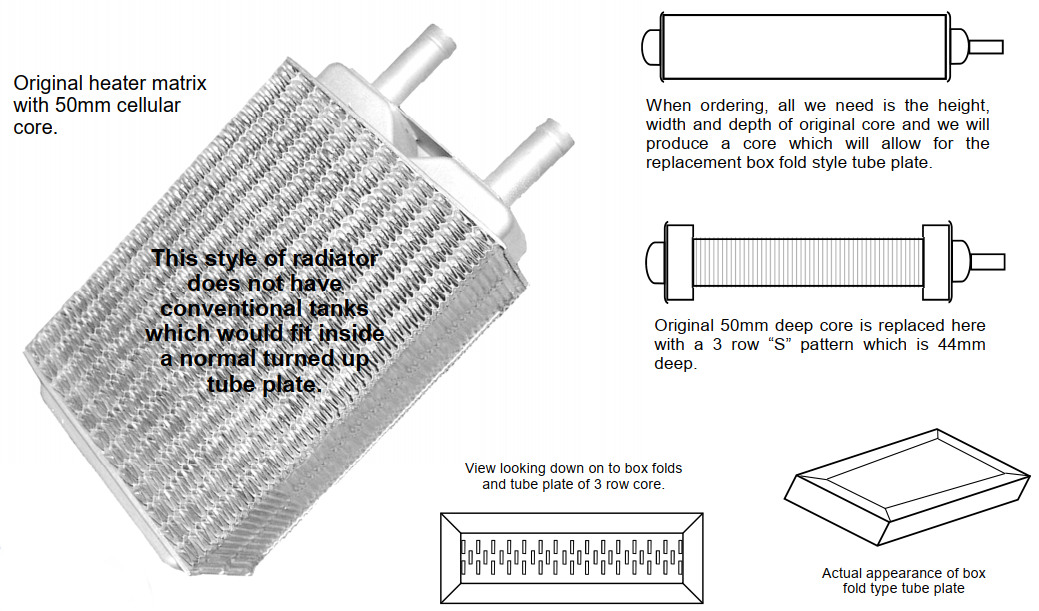
Replacement Cores for Cellular Vintage Style Radiators and Heaters

Usando la Página Web
Aquí encontrarás algunos breves videotutoriales sobre cómo usar algunas de las características de nuestra página web.
Solicitar una Factura Pro Forma es fácil. Sencillamente accede a tu cuenta (o regístrate si no tienes una), ve a Mi Cuenta y haz click en Solicitud Pro Forma.
Todos los trabajos de fabricación de nuestra factoría tienen un seguimiento de principio a fin. Puedes seguir el progreso de tus trabajos en proceso en la pantalla de 'Historial de Pedidos', como se muestra a continuación...
Puedes seguir el envío de tu pedido reciente en la pantalla 'Historial de Pedidos'. Cabe apuntar que esto solo funciona para pedidos enviados con nuestra empresa habitual TNT. Si has solicitado un servicio diferente, la información de localización se puede solicitar a nuestro equipo de ventas. Compruébalo en el siguiente vídeo...
Puedes añadir nuevas direcciones de envío en tu cuenta online en la página 'Mi Cuenta'. Esto te permite seleccionar fácilmente una dirección de envío alternativa al hacer tu pedido online.
Aquí tienes algunos ejemplos de las muchas formas en las que puedes usar nuestro catálogo para buscar productos. Puedes hacer click en cualquiera de los ejemplos para ver los resultados:
Buscar por OEM (número de Fabricante de Equipamiento Original)

(Puedes buscar por OEM, OEM parcial o por el número de referencia de un proveedor)
Buscar un Radiador Komatsu

Buscar cualquier producto con dimensiones 1085 de alto, 1031 de ancho y 114 de fondo

(Las dimensiones no han de ser exactas. Mostraremos resultados cercanos a las introducidas)
Buscar un Núcleo que tenga 1085 de alto, cualquier anchura

(El carácter * corresponde a cualquier anchura)
Buscar una Sección Bearward

Buscar cualquier producto FIAT de 295 de alto y 202 de ancho

Buscar un núcleo con tapas superiores de tamaño 448 por 109

También puedes usar * para buscar tapas de cualquier anchura. Ej: Tapa 448 x *